By Kendra Murray.
Last spring was a really strange time. Life was pretty normal until it wasn’t. Our entire world got turned upside down overnight. With schools closed, workplaces shut down, and most forms of in-person entertainment gone, many people wondered, what to do with all this time? For me (and many others), it was gardening. I had enjoyed having a large vegetable garden when I was living with my parents, but after purchasing my own home a few years ago, planting a new garden was still on the “To Do” list. We were lucky enough to be getting surplus produce from my folks’ garden, but it just wasn’t the same as walking out the door and harvesting vegetables right off of the vine. Although thankfully still working, I did find myself with a bit more free time, as did my boyfriend Matt. He was incredibly enthusiastic about beginning a garden and eagerly got to work building three raised beds. We were off!
Since we got started a little later in the season, for this first year we decided it would be best to purchase seedlings rather than start our own from seed. We headed over to Lawrence Greenhouses in New Bedford, a favorite of mine for veggies as well as beautiful potted plants and flowers. Since Covid craziness and food shortages seemed to have given everyone the gardening bug, the selection was less abundant than usual. Nonetheless, there were still more than enough choices to give us a well-rounded garden. We ended up with some nice heirloom tomatoes, cucumbers, and squash, as well as herbs, melons, and peppers. I was hoping for kale but didn’t see any left. I did see some plants marked “Portuguese Kale.” Aha! Collards! I knew it wasn’t actually kale, but I figured kale’s cruciferous cousin would serve me well. I picked up a tray and we were ready to head home and plant.
For the next few weeks, we took good care of our garden: watering, weeding, and watering some more. Everything began sizing up nicely and getting taller. Flowers were showing up on the tomatoes and squash, and our beans began climbing up poles. As our garden started thriving, there was a clear leader in this game, the collards.
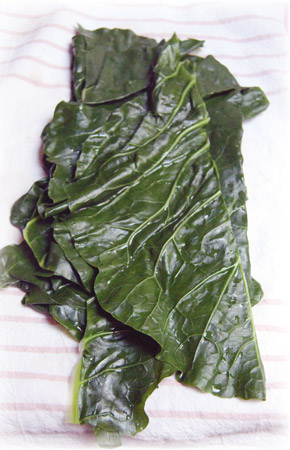
The collards grew hard and fast. Four plants started to seem like about three too many. As soon as I harvested a bunch, another was ready for picking the next day. They kept coming—and coming and coming. I was grateful for the versatility of the vegetable. Some leaves remained on the plant perhaps a bit longer than they should have and became quite large. These substantial leaves became wraps. Move over, tortillas! Collard wraps became a new staple in my house. Bread was no longer a weekly purchase as long as there were big green, plate-sized leaves ready to be harvested daily.
I tried doing different things with my collard wraps: steaming the leaf for half a minute to soften it, cutting out the thick inner stem, and/or flattening it with a rolling pin to make the greens more pliable. All worked well and offered just enough variety to keep me from getting tired of wrapping up sandwiches in leaves. When I was looking for something different though, I threw collards in soups and stews, in scrambled eggs, and even in calzones. Any recipe that normally called for spinach or kale got a big old handful of collards.
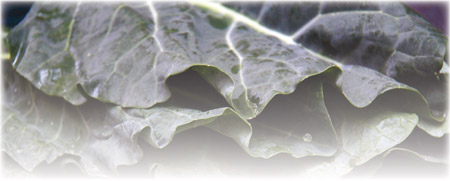
As the summer wore on, our collards developed an issue with cabbage worms. This temporarily slowed down production. Having grown brassicas in the past, I was prepared to tackle the infestation with Bacillus Thuringiensis (Bt) spray. Bt is an organic biological pesticide that can be purchased at many local hardware and gardening stores. It is a common soil bacterium that several different moths, caterpillars, and beetles do not like. Cabbage moths lay their eggs on the leaves of collards and other brassicas. When these eggs hatch, the larvae (cabbage worms) eat the leaves. If the leaves have been sprayed with Bt, the larvae eat the leaves and then die. If you really do not want to spray your crops, there are several alternative methods for dealing with these pests. You can use floating row covers on your collards to keep moths from laying their eggs; spray eggs and larvae off of your plants with a hose; or if you’re not too squeamish, you can pick the eggs and caterpillars right off of the plants.
With these garden pests under control, the plants went crazy again. At that point, Matt and I were both growing a little tired of wraps and began storing our collards. The easiest way I found to do this was blanching and freezing. After harvesting and washing the collards, I cut out the thick middle stems and cut the leaves into small squares. The chopped leaves were dropped into boiling water and cooked for about three minutes. A short bath in ice water helped the greens to stop cooking and cool down. I then wrapped the collards in a dish cloth and wrung out as much water as I could. I divided the collards into 8 to 16 ounce portions and popped them into the freezer. It was very easy, and a great way to preserve the harvest. We were eating collards well into the winter months. The pre-portioned bags were perfect if I wanted to add something green to a soup!
This year, we have collards in our garden again, but we took the time to start them from seed in the late winter with the assistance of grow lights. I’m already preparing for a summer of green sandwiches and a winter of hearty collard stews! I’ve included a recipe for chickpea collard wraps that are great for a summer snack. It’s colorful, crunchy, and a little more impressive than your typical tuna salad. Happy harvesting!
Try out Kendra’s recipes for Spicy Late-Summer Collards and Chickpea Collard Wraps!
Kendra Murray is spending her free time this summer out in the garden. When not harvesting collards, she enjoys hiking, reading, and days at the beach.